
V2026.01
KREDO Release notes on March 10, 2026
Release Date: March 10, 2026
Platform: KREDO Learning Platform
Publisher: Tesseract Learning Pvt. Ltd.
Document Version: V1.0.0
Disclaimer
The content in this document is proprietary and confidential. It is intended solely for authorized users of the KREDO Learning Platform within the client organization. Sharing this content outside your organization or with teams not implementing KREDO is strictly prohibited.
If you adapt this content for internal documentation, include this disclaimer. Updates and iterations will be communicated via email by your assigned Customer Experience Specialist.
For KREDO queries, email kredoexperience@tesseractlearning.com.
Overview
This release introduces enhancements to assessment configuration, session timeout management, video playback, reporting, and administrative controls. It also adds AI-powered Roleplay simulations, improves content creation workflows, expands language support, and introduces updates to security, classroom management, and learning paths.
V1.0.0 – Enhancements
1. Hide Score on Assessment Result Page
Administrators can now control whether learners see their assessment scores after completing an assessment. This setting allows learners to receive confirmation that their attempt was submitted without displaying the score.
How to configure
- Navigate to Assessment Configuration.
- Enable the Disable Score Display toggle.
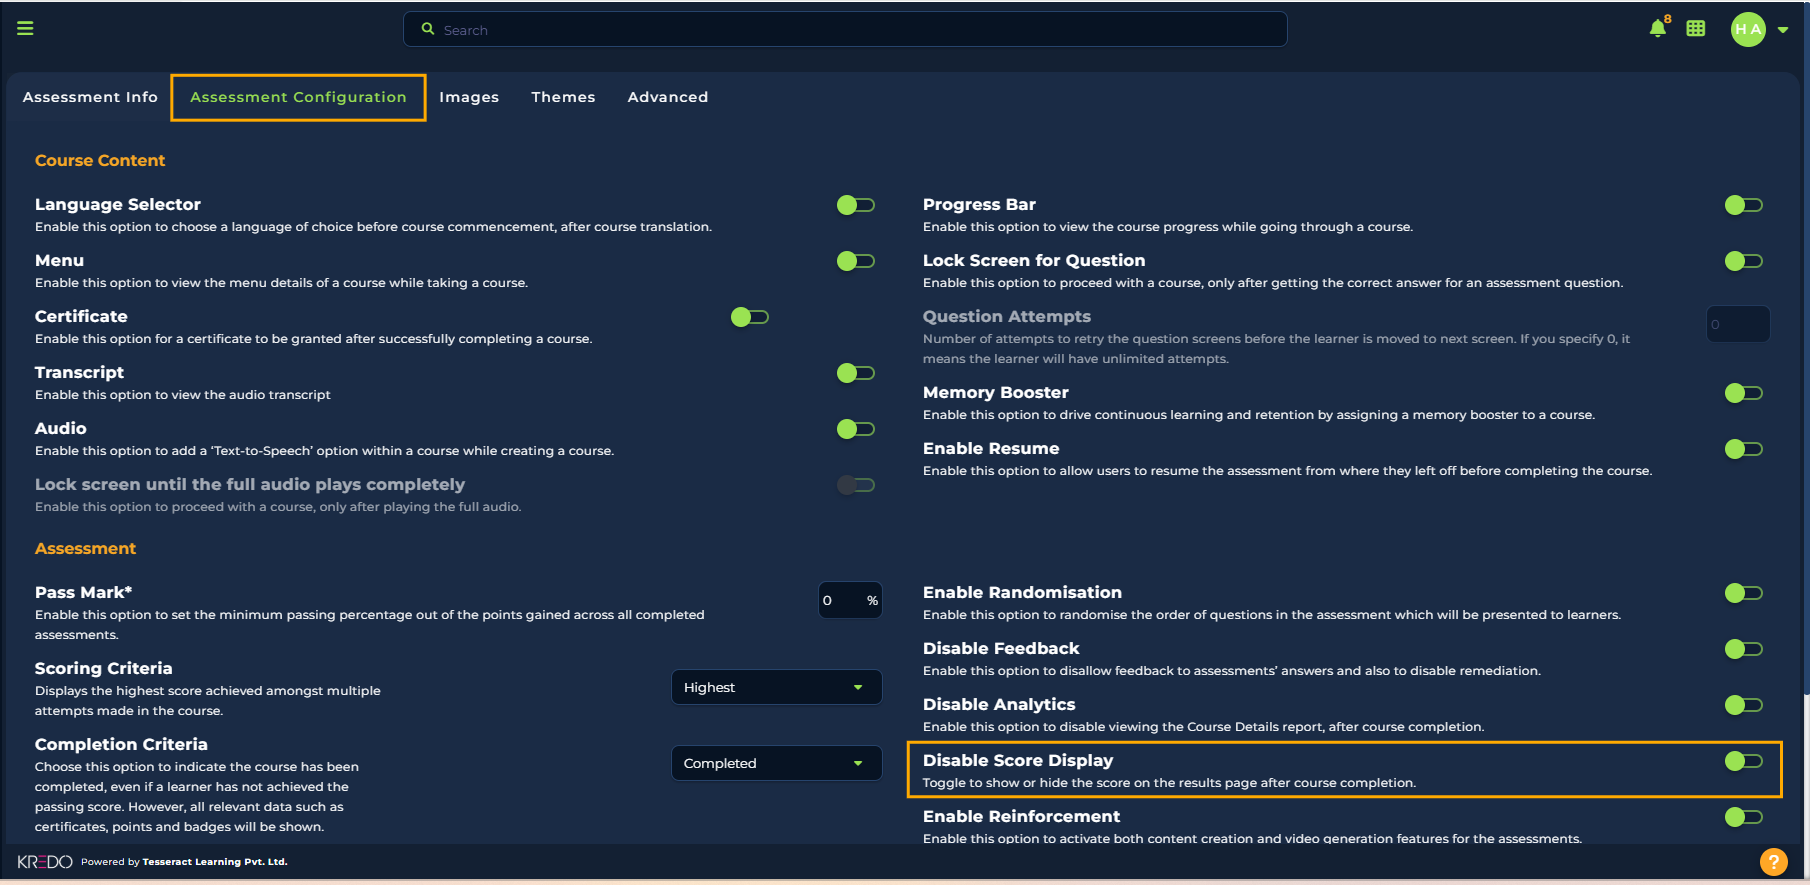
Figure 1: Assessment Configuration – Admin View
Learner experience
When the setting is enabled, the completion pop-up confirms the assessment attempt without displaying the score. By default, scores remain visible.
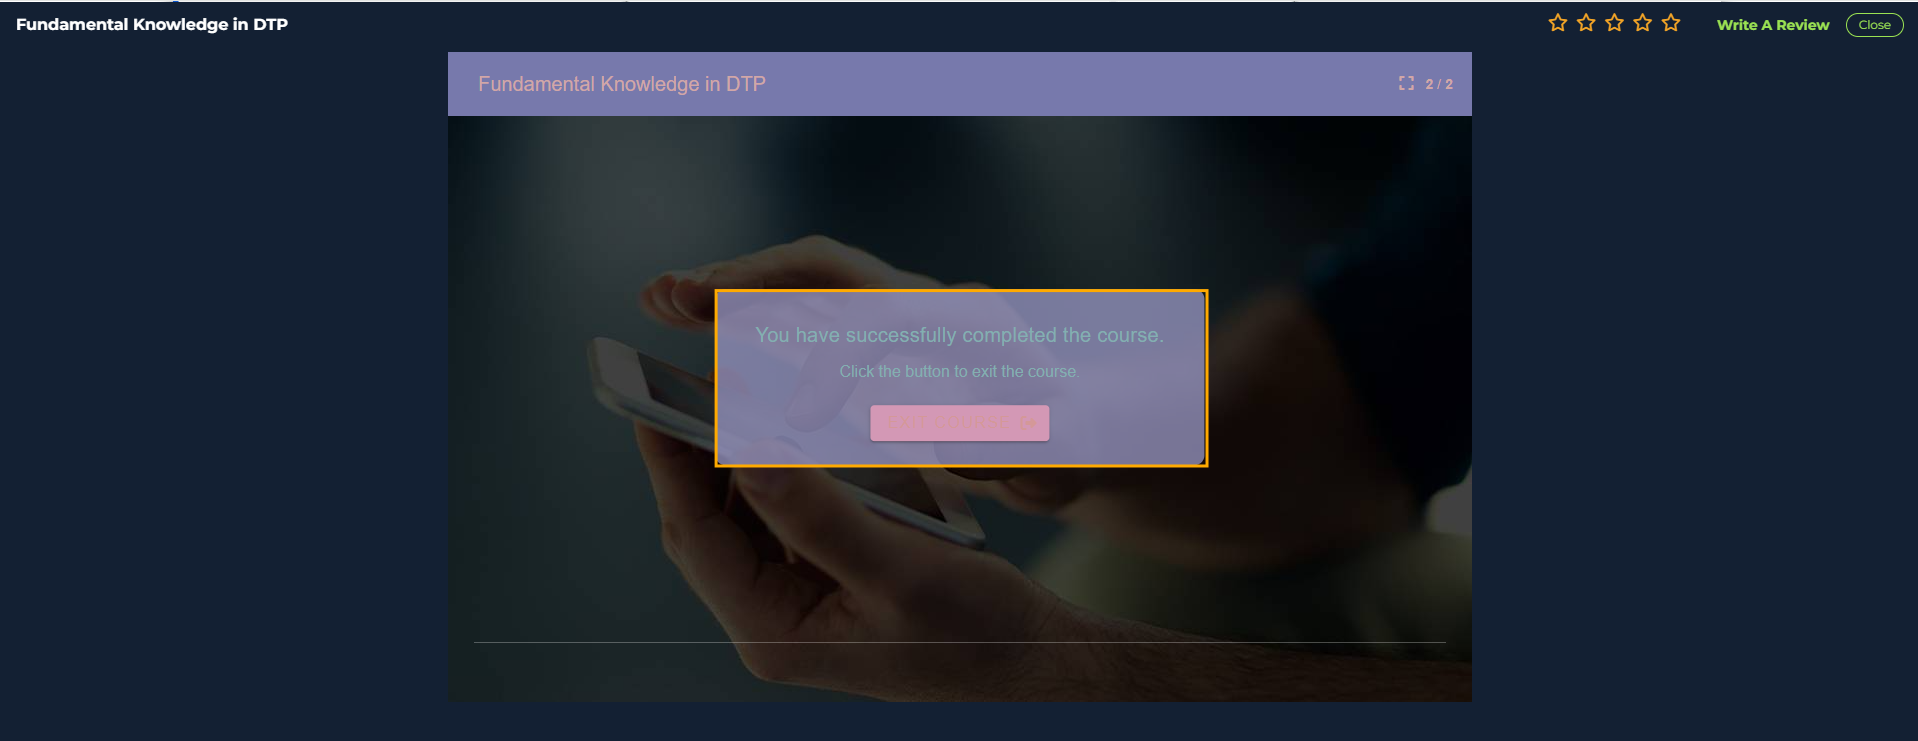
Figure 2: Assessment result with the score hidden.
2. Content Session Timeout
Content Session Timeout is now enforced consistently across courses, resources, assessments, and SCORM packages. This enhancement helps manage inactive content sessions and provides learners with a warning before the session expires.
How to configure
- Navigate to Menu > Settings > Features.
- Enable Content Session Timeout.
- Set the required timeout duration.
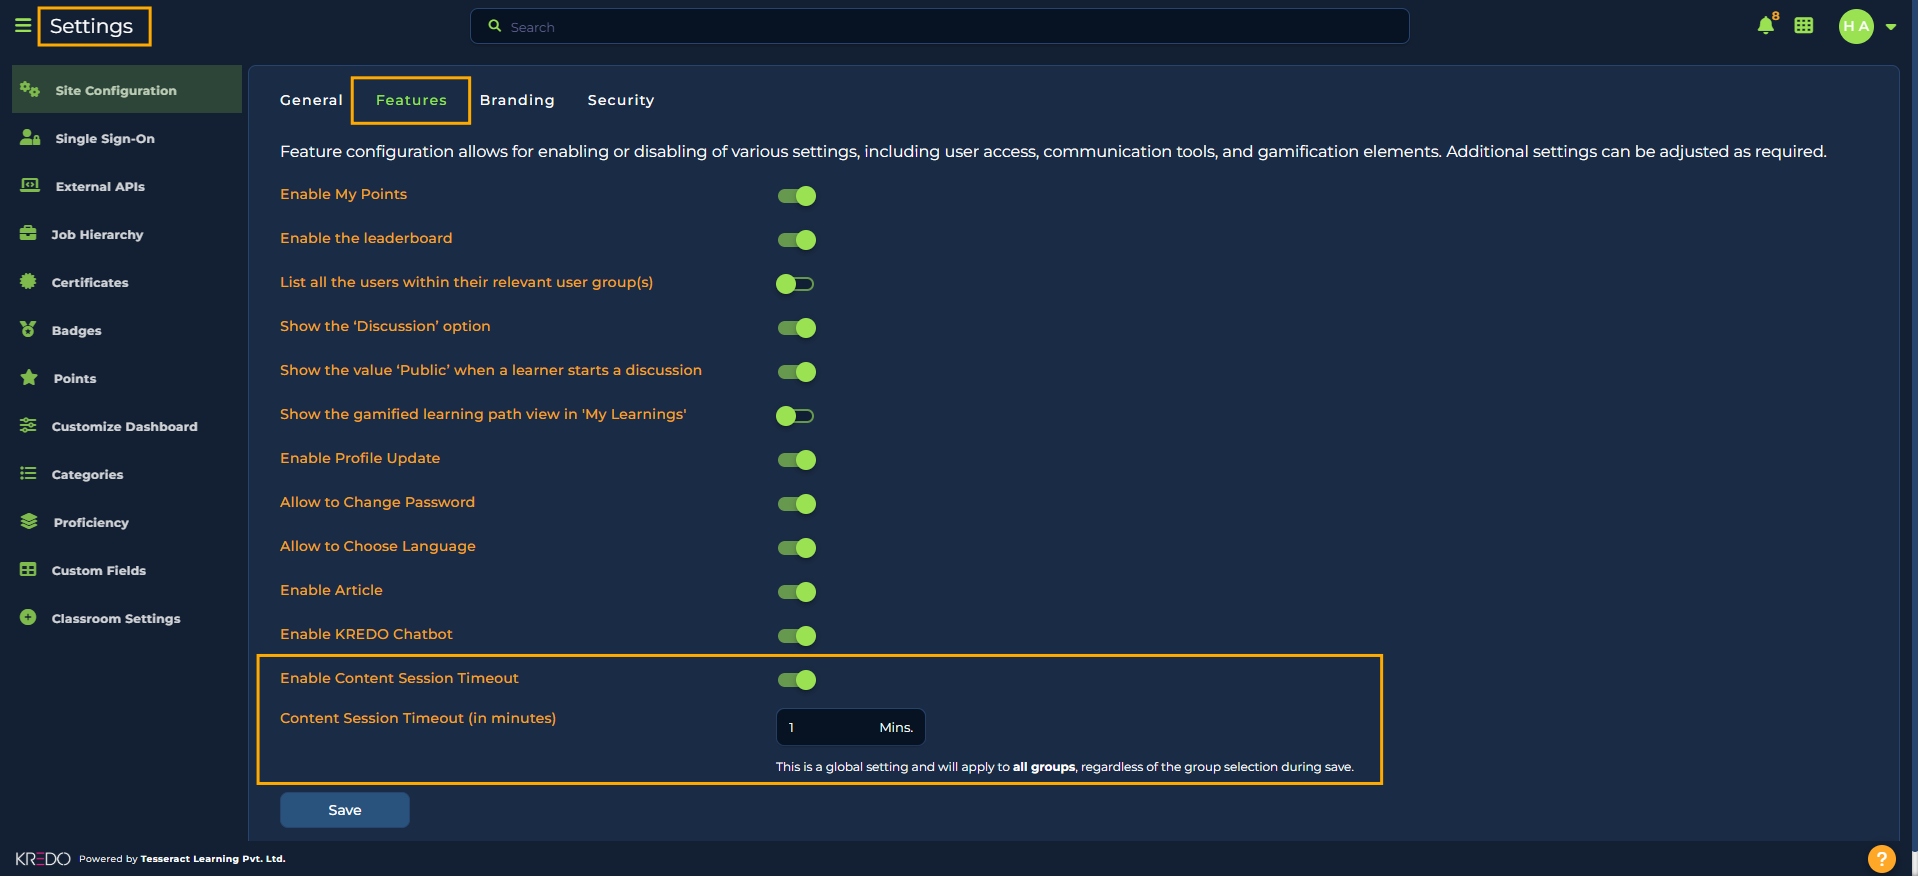
Figure 3: Content Session Timeout option – Admin View.
Learner experience
- A warning pop-up appears before the session times out.
- Learners can choose to continue their session.
- If no action is taken, the learner is redirected to the dashboard.
Figure 4: Content Session Timeout – Learner View. Add the corresponding screenshot here.
Example
For a six-minute course, the timeout warning appears after five minutes, notifying the learner that the session is about to expire. The learner can select Continue to remain in the session. If no action is taken, the learner is redirected to the dashboard.
3. Playback Speed Option for Course Videos
Learners can now adjust the playback speed of videos within courses. Administrators can enable this option while authoring a course.
How to configure
- During course creation, select a video template, such as Record Video or Upload Video.
Figure 5: Video Template – Admin View. Add the corresponding screenshot here. - On the Course Authoring page, locate and enable the Playback Speed option.
Figure 6: Playback Speed option – Admin View. Add the corresponding screenshot here.
Learner experience
When playback speed is enabled, the video player provides the following speed options:
- 0.5x
- 1x
- 1.5x
- 2x
Figure 7: Course Video Player – Learner View. Add the corresponding screenshot here.
This enhancement allows learners to adjust video speed to suit their learning pace, whether they want to review content quickly or slow down for complex topics.
4. Assessment Pass/Fail Display in Course Reports
Pass/fail visualization is now available in Course Summary Reports for assessments. This allows administrators to review learner outcomes more easily without manually sorting assessment results.
How to access
The feature is available through the following locations:
- Course Summary Report: Navigate to the View More page.
Figure 8: Course Summary Report – Admin View. Add the corresponding screenshot here. - Assessment Settings: Navigate to Assessment > General Settings > Report.
Figure 9: Assessment General Settings – Admin View. Add the corresponding screenshot here.
Availability
This feature applies to assessments only.
Benefits
Administrators can quickly identify pass/fail outcomes, review learner performance, and analyze assessment results.
5. Course Filter Enhancement: Admin Role
The Created By filter on the Courses page now includes the Admin role. This allows users to filter courses created by administrators.
How to access
- Navigate to Courses.
- Open Filters.
- Select the AND/OR filter option.
- Locate Created By and select the required role, including Admin.
Figure 10: Course Filter – Admin View. Add the corresponding screenshot here.
6. AI Roleplay
AI Roleplay introduces AI-powered simulations that allow learners to practice workplace conversations and soft skills in realistic scenarios. Learners interact with an AI persona, and their performance is evaluated based on their responses and problem-solving during the simulation.
How to access AI Roleplay as an administrator
- Navigate to Menu > Role Play from the Admin Dashboard.
- The AI Roleplay page opens and displays the existing simulations.
Figure 11: Admin Menu – Roleplay option. Add the corresponding screenshot here.
Figure 12: AI Roleplay page – Admin View. Add the corresponding screenshot here.
6.1 Create a simulation
Administrators can create simulations using uploaded scenario documents.
- Click Create Simulation.
- Enter the simulation details:
- Name: Enter a descriptive title for the simulation.
- Upload Document: Upload the supporting scenario document.
Supported formats:.PDF,.PPT, and.PPTX. - Complete all mandatory fields marked with an asterisk (*).
Figure 13: Add Simulation Basic Details. Add the corresponding screenshot here.
6.2 Configure the simulation
After submitting the basic details, administrators are redirected to the Add Simulation page. The page contains two sections: Simulation and Criteria.
Figure 14: Add Simulation page. Add the corresponding screenshot here.
Simulation section
Configure the structure and behavior of the roleplay scenario using the following fields:
- Name: Enter the simulation title.
- Description: Provide an overview of the scenario and its objectives.
- AI Persona: Define how the AI character should behave and respond.
- Trainee Role: Specify the learner's role in the scenario.
- Reattempts: Configure whether learners can retry the simulation.
- Duration: Set the maximum time allowed to complete the simulation.
Figure 15: Simulation Details Configuration – Admin View. Add the corresponding screenshot here.
Criteria section
Define the parameters used to evaluate learner performance.
- Click Add Criteria.
- Configure the required evaluation criteria.
- Save, edit, or delete criteria as needed before creating the simulation.
Figure 16: Add Criteria. Add the corresponding screenshot here.
6.3 Create the simulation
After configuring the simulation and its evaluation criteria:
- Click Save to store the criteria.
- Click Create to finalize the simulation.
The completed simulation appears in the AI Roleplay Simulation List, where administrators can manage it.
Figure 17: AI Roleplay Simulation List. Add the corresponding screenshot here.
6.4 Manage simulations
From the Actions (⋮) menu, administrators can:
- Edit: Modify simulation details and evaluation criteria.
- General: Publish or unpublish the simulation.
- Preview: View the simulation as learners will experience it.
- Delete: Remove the simulation.
Figure 18: Simulation Management Options. Add the corresponding screenshot here.
The Uploaded Document option allows administrators to export a document uploaded for the AI Roleplay simulation.
Figure 19: AI Roleplay – Uploaded Document. Add the corresponding screenshot here.
6.5 Publish and assign a simulation
To make a simulation available to learners:
- Open General Settings from the Actions menu.
- Select Publish.
- Choose the users or user groups.
- Click Publish to confirm.
Administrators can also select Unpublish or Unpublish All to remove learner access without deleting the simulation.
Figure 20: Roleplay Publish/Unpublish. Add the corresponding screenshot here.
6.6 Access AI Roleplay as a learner
Once a simulation is published and assigned, learners can access it from their dashboard.
- Navigate to Menu > Role Play.
- View the assigned simulations displayed as cards.
- Review the available simulation details, including role, duration, attempts, and evaluation criteria.
Figure 21: Roleplay Menu option. Add the corresponding screenshot here.
Figure 22: Roleplay Simulations – Learner View. Add the corresponding screenshot here.
6.7 Start and complete a simulation
- Click Start Practice to begin.
- Click Start Simulation to interact with the AI persona.
Figure 23: Roleplay Simulation – Learner View. Add the corresponding screenshot here.
Figure 24: Start Simulation – Learner View. Add the corresponding screenshot here.
The Simulation Guide provides information about the roleplay, including its duration, skills being evaluated, learning objectives, and tips for success.
The timer starts automatically when the learner begins the simulation. When the configured duration is reached, the simulation ends automatically and the learner's responses are submitted.
Figure 25: Simulation – Live Transcript (Learner View). Add the corresponding screenshot here.
During the simulation, learners can view a live transcript of their interaction with the AI persona on the right side of the screen.
Figure 26: Roleplay Live Transcript. Add the corresponding screenshot here.
6.8 View the evaluation report
After completing a simulation, learners receive an evaluation report containing:
- Overall Score
- Clarity of Communication
- Observations and Recommendations
- Speech Analysis: Tone, clarity, pace, and filler words
- Communication Improvement Tips
- Detailed Review
- Overall Recommendation
Figure 27: Roleplay Evaluation Report – Learner View. Add the corresponding screenshot here.
The report also provides criterion-level scores and analysis.
Figure 28: Criteria Score. Add the corresponding screenshot here.
Figure 29: Analysis of Each Criterion. Add the corresponding screenshot here.
Figure 30: Detailed View and Overall Recommendation. Add the corresponding screenshot here.
Learners can access their full reports later by selecting View Report.
Figure 31: View Report button – Learner View. Add the corresponding screenshot here.
6.9 AI Roleplay Simulation Attempts Report
Administrators and learners can view consolidated performance reports containing information about simulation attempts and learner performance.
Figure 32: AI Roleplay Simulation Attempts Report. Add the corresponding screenshot here.
The report includes the following features:
- Simulation Attempts: Displays all valid attempts made by the learner for the selected simulation.
Figure 33: Valid Attempts. Add the corresponding screenshot here. - Quick Navigation: Allows users to switch quickly between attempts and report sections.
Figure 34: Quick Navigation. Add the corresponding screenshot here. - Performance Metrics: Displays the learner's average score, best performance, average filler words, and total number of simulation attempts.
Figure 35: Scores. Add the corresponding screenshot here. - Criteria Performance Comparison: Compares learner performance across different evaluation criteria.
Figure 36: Criteria Performance Comparison. Add the corresponding screenshot here. - Trend Analysis: Shows how learner performance changes across multiple attempts over time.
Figure 37: Performance Trend Analysis. Add the corresponding screenshot here. - Performance Trend: Provides a visual representation of score improvements or declines across successive attempts.
Figure 38: Performance Trend. Add the corresponding screenshot here. - Detailed Attempt Reports: Provides an in-depth analysis of each attempt, including criteria, speech, conversation, and insights.
Figure 39: Detailed Attempt Report. Add the corresponding screenshot here. - Key Improvement Areas: Identifies skills or criteria where the learner needs improvement.
Figure 40: Key Improvement Areas. Add the corresponding screenshot here.
Reports can be exported for offline analysis.
Figure 41: Export Option. Add the corresponding screenshot here.
7. Courses – Preview Option in Archive
A Preview option is now available for archived courses. Administrators can view course content without restoring the course.
How to access
- Navigate to the Courses page.
- Open the Status dropdown.
- Select Archived.
- Use the Preview option to view the archived course.
This enhancement is currently available for courses only.
Figure 42: Preview option – Course Archive Section. Add the corresponding screenshot here.
8. Trainer Report – Export All Option
An Export All option is now available under Trainer Profile > View More in Trainer Report.
This option allows users to download all asset data associated with a trainer's profile in a single file, making data access and reporting more efficient.
Figure 43: Export All option – Trainer Report (Admin View). Add the corresponding screenshot here.
9. Platform Language Support
KREDO now supports additional regional languages to improve accessibility and the user experience.
Users can change their preferred platform language from the Admin Dashboard.
How to change the language
- Open the Profile menu from the Admin Dashboard.
- Select Change Language.
- Choose the preferred language.
Figure 44: KREDO Language Support. Add the corresponding screenshot here.
10. Course Translation – Localization Enhancement
Course localization has been enhanced with additional language support.
- Auto Translation: Bengali is now available.
- Manual Translation: Bengali, Punjabi, and Gujarati are now available.
These additions support broader regional accessibility and help make learning content available to more learners.
11. Classroom – Mark Attendance and Report Filter Enhancement
The Classroom module now includes an Attended (Yes/No) filter in both Mark Attendance and Report Filters.
Administrators can use this option to record attendance status and filter reports based on whether participants attended the classroom session.
Figure 45: Classroom Attended Filter Option – Admin View. Add the corresponding screenshot here.
12. Learning Path – End Date and Time Schedule Update
The Schedule option in Learning Paths has been enhanced with Start Date and Start Time fields.
How to access
- Open the required Learning Path.
- Navigate to Add Content.
- Locate the Schedule option.
- Configure the start date and start time as required.
Figure 46: Learning Path Schedule option – Admin View. Add the corresponding screenshot here.
13. Discussions – Recent Discussions
Administrators can now control the visibility of the Recent Discussions section on the dashboard.
How to configure
- Navigate to Settings > Features.
- Locate the Recent Discussions toggle.
- Enable or disable the toggle to control the section's visibility on the dashboard.
Figure 47: Discussion Settings – Admin View. Add the corresponding screenshot here.
14. Support Ticket Logs – Export Option
An Export option is now available for Support Ticket Logs.
Users can download ticket log details for reporting and tracking purposes.
Figure 48: Support Ticket Export option – Admin View. Add the corresponding screenshot here.
15. Manage Request – Access Control Enhancement
Access to the Manage Request menu has been restricted to specific roles.
The menu is now visible only to:
- Admin
- Manager
- Reporting Manager
It is no longer visible to all users. This enhancement limits access to the Manage Request option based on the supported roles.
16. Course Status Enhancement
Course status synchronization has been improved.
When a course is added to a published Learning Path, the course status automatically changes to Published instead of remaining in Draft status.
This enhancement helps keep the course status aligned with the published Learning Path.
17. Question Bank (QB) Enhancement
The Question Bank selection process in Create Assessment > Advanced has been enhanced to support question selection from existing Question Banks and topic-based question mapping.
17.1 Select a Question Bank
- Open Create Assessment.
- Navigate to the Advanced section.
- Select an existing Question Bank from the dropdown list.
- If the required Question Bank is unavailable, select Create Question Bank to create a new one.
Figure 49: Question Bank – Assessments. Add the corresponding screenshot here.
17.2 Configure the Question Bank
The Question Bank Summary displays the available questions by difficulty level:
- Easy
- Medium
- Hard
The summary also displays the total number of available questions.
Users can configure the number of questions to be pooled from the selected Question Bank.
Figure 50: Question Bank Configuration. Add the corresponding screenshot here.
17.3 Configure topic-wise question selection
The Topic-Wise Selection option allows users to select questions based on topics.
The Topic Level Difficulty Segregation section allows users to assign question counts by difficulty level for the selected topics.
The Question Bank Summary provides an overview of the available questions by difficulty level and the total question count.
17.4 Create a Question Bank
The Create Question Bank section now supports topic-based question mapping.
The downloaded Excel template includes an additional Topic column. Users can use this column to map questions to specific topics for improved organization and topic-wise segregation.
Figure 51: Question Bank Excel Template. Add the corresponding screenshot here.
17.5 Question count validation
The following validation rules apply:
- The sum of selected questions across topics and difficulty levels must match the total number of pooled questions.
- The total count of questions distributed across topics must match the overall pooled question count.
- The Total Questions count is displayed automatically to help users verify the allocation and prevent mismatches.
17.6 Learner experience
On the learner side, the Question Bank is displayed according to the Question Bank mapped to the assessment. Learners see and attempt only the questions specifically mapped to that assessment.
18. Proctoring Configuration for Assessments
Proctoring settings are now available for assessments. This feature supports webcam-based monitoring during online exams to help verify learner identity and prevent malpractice.
When proctoring is enabled, administrators can configure the following controls.
Browser controls
- Restrict Full Screen: Prevents learners from exiting full-screen mode during the exam.
- Restrict Tab Switching: Blocks switching between browser tabs during the exam.
- Restrict Mouse Right Click: Disables the right-click context menu during the exam.
Learner monitoring
- Periodic Face Capture: Captures the learner's photo at intervals to verify identity.
- Participant Video Recording: Records the learner's video throughout the exam.
- Participant Screen Recording: Records the learner's screen to monitor activity.
Figure 52: Proctoring Configuration – Assessment (Admin View). Add the corresponding screenshot here.
19. Article Creation Enhancements
The Content Hub > Article section is now customizable and available to both administrators and learners.
Users can enhance articles by adding and configuring the following elements:
- Banner
- Title
- Heading
- Paragraph
- Video
- Tags
- Description
- Thumbnail
- Duration
Figure 53: Content Hub Article Section (Admin View). Add the corresponding screenshot here.
20. Survey Bulk Upload
A Bulk Upload option has been added to the Survey section to simplify survey creation.
Administrators can upload multiple survey questions at once using the prescribed file format.
Supported format
.XLSMonly
A sample template is available through the Download Sample Format option.
Figure 54: Survey Bulk Upload – Admin View. Add the corresponding screenshot here.
21. Course Metadata Update
A new Update Metadata option is available on the Course Authoring page.
This feature applies to both courses and assessments, allowing administrators to update and manage metadata more efficiently.
Figure 55: Course Metadata – Admin View. Add the corresponding screenshot here.
22. AI and Guided Course Creation – UI Enhancements
The user interfaces for the following content creation workflows have been updated to provide a more intuitive and streamlined experience:
- Course Creation using AI
- Guided Course Creation
- Course Creation using File
The updated designs provide a more modern interface, improved usability, and a more seamless step-by-step experience to support faster and more efficient content creation.
Figure 56: AI Course Creation – Admin View. Add the corresponding screenshot here.
Updated UI for AI-based assessment creation
The interface for creating assessments using AI has been revamped.
Figure 57: AI-Based Assessment Creation – Admin View. Add the corresponding screenshot here.
Updated UI for guided course creation
The interface for Guided Course Creation using AI has also been revamped.
Figure 58: Guided Course Creation – Admin View. Add the corresponding screenshot here.
Updated UI for course creation using a file
The interface for Course Creation using File with AI has been revamped.
Figure 59: Course Creation Using File – Admin View. Add the corresponding screenshot here.
23. UI Enhancement – AI Chatbot
The AI Chatbot interface has been upgraded with a responsive design to provide a seamless experience across devices.
Figure 60: AI Chatbot – Learner View. Add the corresponding screenshot here.
Learners can also view their chat history. The chatbot can respond to user queries, improving interaction and providing real-time assistance.
Figure 61: KREDO AI Chatbot. Add the corresponding screenshot here.
24. Reels
The Reels feature now includes an enhanced Report option for administrators, providing more comprehensive tracking of user activity.
Figure 62: Reels – Admin View. Add the corresponding screenshot here.
Report details
The report includes the following information:
- Username
- Email ID
- User Group
- Start Time
- End Time
- Duration of engagement
Filters
Administrators can filter the report by user, group, date, or duration to review specific activity.
Export
Report data can be exported for offline analysis and record-keeping.
25. Roleplay Report
The Roleplay Report in the Reports section has been enhanced and organized into two sections:
- Overview Report
- Simulation Overview
Administrators can use a toggle button to show or hide these sections.
Figure 63: AI Roleplay Summary Report – Admin View. Add the corresponding screenshot here.
25.1 Overview Report
The Overview Report focuses on learner performance and provides the following information.
- Total Learners: Number of learners who participated.
- Simulation Attempts: Number of times learners attempted the roleplay.
- Average Score: Overall performance score of learners.
- Skill Distribution: Categorizes learners as Excellent, Good, or Needs Improvement.
Figure 64: Skill Distribution. Add the corresponding screenshot here. - Top Performers: Highlights the highest-scoring learners.
Figure 65: Top Performers. Add the corresponding screenshot here. - Areas for Improvement and Needs Support: Identifies learners or skills that require additional attention.
Figure 66: Areas of Improvement and Needs Support. Add the corresponding screenshot here. - Detailed Criteria Performance: Displays scores for each evaluation criterion configured by the administrator during simulation setup.
Figure 67: Detailed Criteria Performance. Add the corresponding screenshot here.
25.2 Simulation Overview Report
The Simulation Overview Report focuses on simulation-level metrics rather than individual learner performance.
It includes the following information:
- Total Simulations: Number of roleplay simulations created.
- Total Assigned: Number of learners assigned to each simulation.
- Total Completed: Number of completed simulations.
- Average Completion: Average score or performance per simulation.
- Top Performing Simulations: Highlights the best-performing simulations.
Figure 68: Top Performing Simulations. Add the corresponding screenshot here. - Needs Attention: Identifies simulations where learners struggled or achieved low scores.
Figure 69: Needs Attention Section. Add the corresponding screenshot here. - Simulations Overview: Provides a summary of simulations and performance trends.
Figure 70: Simulations Overview. Add the corresponding screenshot here.
25.3 View simulation and attempt details
The View More option in the Simulation Overview displays the users assigned to a particular AI Roleplay simulation.
The View More option within Assigned Users for AI Roleplay displays the Simulation Attempts Report, providing detailed insights into each learner's performance and engagement with the simulation.
Figure 71: Simulation Attempt Report – View More option. Add the corresponding screenshot here.
26. Password Policy
The Password Policy feature allows administrators to define rules for creating strong and secure passwords. These policies help improve system security by enforcing specific password requirements.
How to access
Navigate to Menu > Settings > Site Configuration > Security.
Configurable settings
- Password Expiry Days: Defines the number of days after which a password must be changed.
- Minimum Password Length: Sets the minimum number of characters required.
- Maximum Password Length: Sets the maximum number of characters allowed.
- Minimum Uppercase Characters: Specifies the minimum number of uppercase letters (A–Z) required.
- Minimum Lowercase Characters: Specifies the minimum number of lowercase letters (a–z) required.
- Minimum Digits: Specifies the minimum number of numeric characters (0–9) required.
- Minimum Special Characters: Specifies the minimum number of special characters, such as
@,#,$, and%, required.
Administrators can also enable Force Password Change on First Login. When enabled, users must change their password when they log in for the first time.
Figure 72: Password Policy. Add the corresponding screenshot here.
27. On-the-Job Training (OJT) Enhancement
The On-the-Job Training (OJT) module now supports multiple question types, giving trainers more flexibility when collecting feedback and responses.
Supported question types
- Single Choice
- Multiple Choice
- Comment Box
- Star Rating
- Smiley Rating
- Text Slide with Comment Box
- Multipoint Scale
Figure 73: OJT Question Types. Add the corresponding screenshot here.
These options allow trainers to create more interactive OJT assessments and feedback forms.
OJT in Learning Paths
OJT can now be added as part of a Learning Path. When included, the OJT module is placed at the end of the Learning Path.
Limitation: OJT cannot currently be inserted between other modules or steps within a Learning Path.
28. Auto Enrollment Enhancement – Selection of Enrollment Period
The Auto Enrollment feature has been enhanced for all learning assets. A new Select Enrollment Period dropdown has been added alongside the Enrollment To option.
Enrollment period options
- Immediate: The asset can be assigned to learners immediately.
- Custom: Administrators can specify the Start Day and Due By dates.
Figure 74: Auto Enrollment with Enrollment Selection Period. Add the corresponding screenshot here.
This enhancement provides administrators with greater flexibility when configuring auto-enrollment timing.
29. Training Room Master Page – Enhancement
The Training Room Master Page has been enhanced under Settings > Classroom Settings > Training Room Master Page.
Updated training room fields
Previously, the Add Training Room section included the following fields:
- Name
- Country
- City
- Capacity
The following fields have now been added:
- Code
- Region
- State
Figure 75: Training Room Master Page. Add the corresponding screenshot here.
These additional fields allow administrators to maintain more detailed and structured information about training locations.
Support
For KREDO queries, contact kredoexperience@tesseractlearning.com.
Tesseract Learning Pvt. Ltd. | India
Address: No. 2M427, 2nd Main Road, B. Channasandra Main Road, East of NGEF Layout, Kasturi Nagar, Bengaluru, Karnataka 560043
Website: www.tesseractlearning.com
Confidentiality notice: This document contains proprietary and confidential information intended solely for authorized users of the KREDO Learning Platform within the client organization. Do not share it outside the organization or with teams not implementing KREDO.